In this article I’m going to give a technical overview of integrating optimisation with analytics. We’ll concentrate on Webtrends Optimize as the optimisation tool of choice and describe how to integrate into any analytics tool with detailed directions for Google Universal Analytics and Adobe Analytics (formally Omniture Sitecatalyst) but you can use these directions to integrate into any other javascript beacon based analytics tool. Look out for other articles with information on how to integrate other optimisation tools as there may be more efficient ways to do this based on the specific testing tool as Webtrends Optimize is not the most open tool to deal with!
Step 1: Prepare WebTrends Optimize Test
In order to send data to the analytics system, we first need to prepare the test including setting some variables to present the data – this is otherwise known as a ‘soft’ data layer.
In the Optimize interface, where you specify the javascript content of a test version, add these lines:
Most of you will realise this is just a small JS object put into global scope on the page with properties including the name of the testing campaign and the test flavour that is being executed.
[campaign_a] = the name of your campaign, switch for a friendly name as you want it to appear in your reports
[campaign_a:test] = the name of your specific offer/test, switch for a friendly name for reports and to ensure it is specific to the offer/test
Step 2: Prepare Your End Analytics Solution
Within Google Analytics Universal and Adobe Analytics we advise designating at least 1 custom dimension (Google) or 1 eVar (Adobe) to ensure that you can do the necessary dimensional reporting to provide a greater level of insight on the tests.
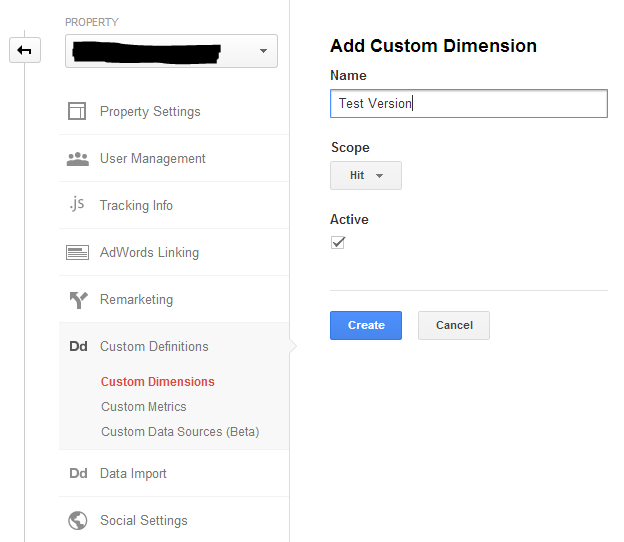
In Google, go to the Admin tab, then within the Property menu click on Custom Definitions > Custom Dimensions. Here you’ll need to create a new custom dimension called ‘Test Version’. We recommend this being set to either the Session or Hit scope rather than User or Product. The reason for this is that the integration will cause the variable to constantly be set each time the user is considered ‘in test’ from the optimisation tool. Because of this you have the option of using Hit vs Session whereas if it was only set once on entry you’d be forced to use the Session scope. User scope is not recommended as this could cause you issues when trying to analyse activity after a test has completed.

In Adobe, go to the Admin area and select the desired Report Suite. Go to the Edit Settings menu and click on Conversion > Conversion Variables in the drop-down. Add a new Conversion Variable (eVar) and ensure you use the following settings:
- Expiration = Visit
- Attribution = Most Recent
- Type = Text String

As per the advice for Google, we recommend setting the Expiration (same thing as scope) to be Visit (Session). We don’t recommend using the Pageview expiration option (like Hit for Google) as Adobe has quite strict attribution rules when it comes to how data is correlated to eVars in relation to the method the data is sent to the servers. As the data would be sent to the servers using a custom link event tracking call you cannot actually use a Pageview expiration as the data will disappear into a blackhole!
Step 3: Bind Tracking to the Optimize Prerender Event
The Optimize API fires several DOM level events during its time on a page. The one we need it the PRERENDER event which is defined by the documentation as:
“Fires immediately prior to Optimize rotating content into a page. This event fires once, and only if is there is a configured test or target in Optimize assigned to rotate content into the page.”
So we can bind really easily to DOM events in Javascript. No need to use jQuery unless you have a specific reason to of course. The hanlder that is bound to the event should send the data to your analytics solution. In this case we are sending the data to Google Universal Analytics as a custom dimension and associated event.
For Google Universal Analtyics
For Adobe Analytics (Omniture SiteCatalyst) where event10 measures test load
Step 4: View Your Data
All that’s required now is to log into Google Analytics and look at your events to see how many times this has fired or use the custom dimension to segment your data as you want to. This can be done using the Real-Time reporting capabilities to give you a way of validating data. To actually then use the custom dimension data or build behavioural segments to compare performance then you’ll need to put your analyst skills to work – or contact us to help you of course.
Enhancement: Track Test Load AND Test Success
So you want to track success events, not just times the test is loaded? No problem! Just bind to the CONVERSION event instead or as well as the PRERENDER.
For Google Universal Analytics
For Adobe Analytics (Omniture SiteCatalyst) where conversion is measured in event11
Don’t forget that this method of tracking can be applied to most common optimisation tools to send data to most common analytics systems, so don’t be afraid of modifying the code to suit your toolset.

